From Broadcast Lines to the Flat-Screen Grid
Broadcast lines to the flat-screen grid: understand how scanning, conversion, and pixels shape old footage, so you can choose display settings with more confidence.
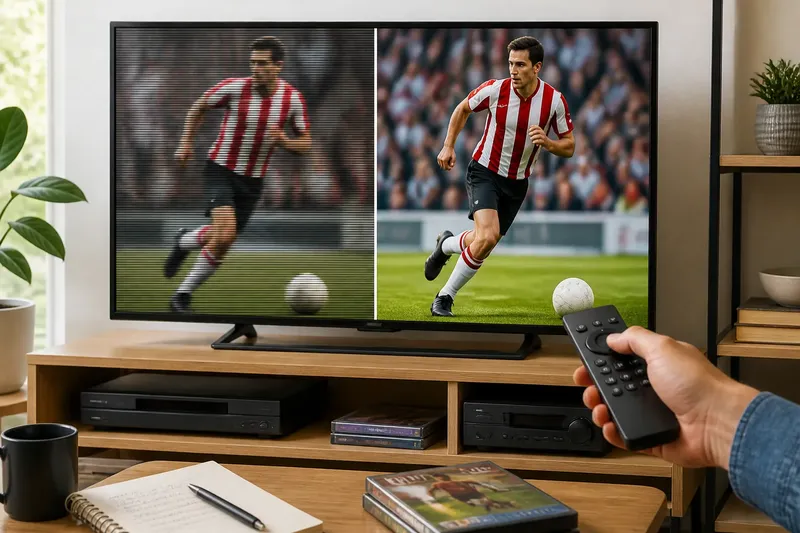
A family video on a flat-screen television can look oddly different from the same footage on an old tube set: fine horizontal textures may shimmer, edges may soften, and motion may feel unlike the memory. The shift from broadcast lines to the flat-screen grid helps explain why. It changed how image information is arranged, transmitted, converted, and shown.
Follow the picture path
To understand a screen image, start before it reaches the display. A camera or other source creates image information; a broadcast or recording format carries it; a device interprets the signal; and the screen turns it into light. Each stage can preserve, change, or discard detail.
“Old television picture” can describe several different things: how a camera scanned a scene, the format used to transmit it, or the display that reproduced it. These parts often worked together, but they are not interchangeable. A digital video can preserve the timing and line structure of a broadcast-era signal, while a modern panel still renders the result with pixels.
When an old clip looks rough, consider which stage is responsible before changing a picture control. The source may contain limited detail, conversion may have softened it, or the screen may be emphasizing artifacts in the way it displays the signal.
Read the scanning lines
In a traditional tube television, an electron beam swept across the inside of the screen, lighting phosphor in a line before moving to the next. It repeated the process quickly enough for viewers to perceive a moving picture rather than a point of light traveling across the screen. The image was organized as rows scanned in sequence.
Broadcast systems also used interlacing. Instead of sending every row in one continuous pass, the signal carried alternating sets of lines, often called fields. The fields combined in perception to form a frame. This approach managed the amount of information transmitted while refreshing motion content frequently.
Interlacing can affect the image. A still scene may appear detailed when the fields align, while quick movement can leave comb-like edges or make fine horizontal patterns flicker. The result depends on the scene, signal, and display. “Lines” describes not just visible stripes, but a way of dividing and timing picture information.
For archival footage, watch a moving edge, such as a hand crossing a plain wall. Its behavior can reveal more about interlacing than a paused frame.
See what pixels change
A flat-screen panel is built from a fixed grid of picture elements, or pixels. Each pixel represents a small area of color and brightness. The panel forms an image by addressing those points, rather than sweeping a beam over a phosphor-coated tube.
The grid makes the display’s native resolution important. When a video’s dimensions match the panel’s pixel grid, the display can often map image points directly. When they differ, the device scales the picture by estimating how the source should fit the available grid. That can soften edges, create uneven patterns, or leave unused space around the image.
A pixel grid does not mean every source image began as pixels in the same sense. Film frames, analog camera signals, and scanned broadcasts can all be converted into digital samples. Once stored as digital video, they have pixel dimensions, but their original detail and artifacts still reflect how they were captured and transmitted.
Think of the pixel grid as the display’s address system, not a promise that the source contains a matching amount of real detail. A higher-resolution panel cannot recover information that was absent from the recording.
Understand the conversion
Many older television signals were designed for tube displays and broadcast conventions. A modern screen must interpret that material, often converting interlaced video into progressive frames. Progressive video presents all the image’s rows together for each frame rather than dividing them into alternating fields.
This conversion is called deinterlacing. A simple method may combine fields, which can work for still areas but produce artifacts around motion. More advanced processing tries to identify movement and construct a cleaner frame. The device may also scale the image, adjust its shape, or apply noise reduction.
These operations are not neutral. Noise reduction can soften fine texture; aggressive scaling can make edges unnaturally crisp; and the wrong aspect ratio can stretch faces or circles. A picture that looks more modern is not necessarily more faithful.
Imagine you connect a DVD player to a flat-screen television and a recorded sports clip shows comb-shaped edges around a running player. You note the current processing setting, switch to the option intended for video sources, and replay the same movement at normal viewing size. If the combing is less visible and motion still looks natural, keep the change; if the player smears or trails, restore the original setting. The observable comparison helps distinguish a useful adjustment from one that merely alters the picture.
Check the format fit
Before changing controls, identify the incoming image and how the screen is fitting it. A source label may describe resolution, frame rate, or whether a signal is interlaced, but menus differ. The source device and display may also process the image at separate points, so duplicate enhancement can make it look worse.
- Check the source format. Look at the player, receiver, or streaming device’s information screen. If it identifies an interlaced output, consider the display’s deinterlacing options; if it does not, avoid assuming the original recording was progressive and judge visible motion instead.
- Check the aspect ratio. Compare a familiar face and a circular logo. If either looks stretched, select an original-proportion or automatic-fit setting; if both look correctly shaped, leave the fit unchanged rather than forcing the image to fill the panel.
- Check the image borders. If captions or picture details disappear at the edges, look for a screen-fit, just-scan, or full-pixel option; if the whole image is visible, keep the current setting instead of changing it without a reason.
- Check motion processing. Play a scene with a moving edge and watch for combing, trailing, or an unnaturally smooth appearance. If a processing option reduces the visible artifact without creating another, keep it; if motion becomes smeared or artificial, restore the earlier setting.
- Check one reference scene. Use the same short segment, including a familiar face, subtitles, or a moving object. If a change improves that scene without distorting its shape or texture, consider keeping it; if the result is ambiguous, return to the original setting and compare again in ordinary viewing conditions.
- Check where processing occurs. If both the source device and television offer sharpening or noise reduction, disable one layer at a time and compare the same scene; if edges or texture look more natural, retain that arrangement, but if the image loses useful definition, restore the previous layer.
Settings and signal handling vary by device. Follow the manufacturer’s instructions and use source-format labels as clues rather than as a complete account of the recording.
Why does old footage look different?
Why do edges look jagged?
Interlaced fields, scaling, and limited source detail can all contribute to jagged edges. The effect may become more visible when a modern display enlarges a small image across its denser pixel grid.
Why do faces look stretched?
The display may be fitting an image with one aspect ratio to a screen with another. Select an original-proportion or automatic-fit option, then check a familiar circle as well as a face.
Does a higher-resolution screen restore detail?
It can display a finely sampled image, but it cannot recreate missing source information. Scaling can spread the picture across more pixels without adding authentic texture or detail.
Should every old video fill the screen?
No. Filling the panel can crop the image or distort its proportions. A smaller image with the correct shape may be more faithful than an enlarged picture that cuts off content.
Judge the whole image
For a fair comparison, use the same clip, keep the display at a comfortable distance, and change one setting at a time. Look at motion as well as still detail: a paused image can hide field artifacts, while fast movement can make processing defects obvious. Let the display settle after each change, then decide whether it improves the scene rather than merely making it brighter or more forceful.
Separate source quality from display behavior, too. A clean modern recording may look crisp on the same panel that shows broadcast-era material with softness or noise. That difference does not necessarily signal a fault. The screen is presenting distinct kinds of image information through one fixed grid.
The shift from broadcast lines to the flat-screen grid is a change in how pictures are represented and interpreted, not a clean break between old and new. Once you can distinguish scanning, conversion, scaling, and shape, you can make a restrained choice: preserve the source’s proportions, reduce a visible artifact, or leave a characteristic imperfection alone. When assessing broadcast lines to the flat-screen grid, begin with the path the picture took, then adjust only what you can see.